Wednesday, November 16, 2011

Chicken (minus the tortilla) Soup

Well, in my last post I promised recipes for yummy soups, and I've been pretty delinquent. There's been plenty of cooking going on in the Maxwell house, just not much time for writing about it! I thought it was finally time to get back on here and tell you about the first soup.

Chicken tortilla soup. Not usually one of my favs, but it sounded good enough to give it a try, and I'm so glad I did! The cheese sauce added in at the end really put this soup over the edge. It kind of reminded me of a chicken enchilada...ya know, only in soup form. Oh, and the title, I don't like tortilla chips in my soup, hence the "minus", but feel free to add them if your little heart desires.


Chicken Tortilla Soup
from Soup Addict

Yield: 4-6 servings

Ingredients:

Soup:
  • 1 tablespoon canola oil
  • 1 tablespoon butter
  • 1 medium yellow onion, chopped
  • 1 rib celery, chopped
  • 2 cloves garlic, minced
  • 4 cups chicken broth
  • 1 red bell pepper, chopped
  • 1 serrano, chopped
  • 1 jalapeno, seeded and minced*
  • 1/2 teaspoon salt
  • 1/4 teaspoon pepper
  • 1/2 teaspoon ground cumin
  • 1/2 teaspoon ground coriander
  • 1 tablespoon sugar
  • 1 tablespoon chili powder
  • 15 ounce can tomato puree
  • 1 tablespoon Worcestershire sauce
  • 1 pound cooked chicken, shredded (if you made your own broth, you've got chicken, if not, a rotisserie chicken would work great)
*Original recipe called for only 1/2 a jalapeno. I like a little heat so I added in a whole one. Add to taste.
    Cheese Sauce:
    • 2 tablespoons butter
    • 2 tablespoons flour
    • 1 cup heavy cream (1/2 and 1/2 or milk if you're feeling less indulgent)
    • 1/2 teaspoon salt
    • 1/2 teaspoon pepper
    • 8 ounces cheese grated (I was able to find a jalapeno Jack cheese, any type of spicy cheese would be great)
    Preparation:

    Soup:

    • Heat oil and butter in a large stock pot or dutch oven over medium heat. Sauté onions, celery and garlic until soft.
    • Add a splash of chicken stock, and then the red bell, serrano and jalapeno peppers. Cook for 2-3 minutes to soften.
    • Add all of the spices (salt, pepper, cumin, coriander, sugar, chili powder), and stir until fragrant.
    • Add the remaining chicken stock, tomato puree and Worcestershire sauce. Mix well and bring to boil.
    • Add chicken, then reduce heat and simmer for 20 minutes or longer, the longer the better!
    Cheese Sauce:

    • Melt butter in a heavy-bottomed sauce pan over medium heat. Stir in flour to create a paste.
    • Slowly add the dairy, stirring constantly, until a thick, creamy sauce is formed. Season with salt and pepper and remove from heat. Add grated cheese and stir to completely incorporate into the sauce.
    • Add cheese sauce to the soup, stirring to mix well. The soup should now be creamy, but not necessarily spoon-hugging thick.
    Time to eat! I could not stop taste testing this after I made it. I made it on a Sunday night to have for lunch all week, but liked it so much I ended up having it for dinner that very night. Top with sour cream, tortilla chips and/or cilantro. Enjoy!

    Friday, November 4, 2011

    Homemade Chicken Stock

    When the temperatures start dropping outside, I start thinking about warm comforting foods. While I would usually pick baking over cooking any day, I love cooking in the fall and winter months. I would much rather prepare a hearty beef stew, steaming bowl of chili or a filling lasagna over a salad any day. Don't get me wrong, I like light spring/summer foods, I just don't find them as fun to prepare.

    Added to the list of good comfort foods I enjoy would definitely be soup. In the sake of being completely honest here, I must confess, until this year, I always bought my soup in a can. It was easy, seemed inexpensive and well, it's just what I had always done. When Nick and I were making the menu for last week, I was trying to think of different things to have for lunch. I was tired of making sandwiches, and it was cold, I wanted something warm. When he said, "Buy some soup", I think I responded with a snort. I was tired of unsatisfying soup from a can. And that's when it happened. I decided this would be the season of the soups. Homemade soups. The plan is this: to make a big batch of soup every Sunday evening that I will be able to eat on all week long! I'm two weeks in and so far I'm loving it! But before we get to the yummy soups that have been coming out of the Maxwell kitchen, we have to start at the beginning.

    So many soups have a base of chicken stock, so it only makes sense that if you want a delicious end result, that you need to start with something delicious. Enter the homemade chicken stock. So much more flavor without all the salt. And it's also much more cost effective!

    A shot of my stock chilling in the fridge.


    Here's the ingredients needed...we're talking basics here.


    And if you can score an organic chicken that's been marked down...even better! This may be the easiest thing I've ever made in my kitchen.


    Homemade Chicken Stock
    adapted from Tyler Florence

    Yield: About 12 cups

    Ingredients:
    • 1 whole chicken, 3 1/2 - 4 pounds, rinsed, giblets removed
    • 2 carrots, cut in large chunks
    • 3 celery stalks, cut in large chunks
    • 2 large white onions, quartered
    • 1 head of garlic, halved
    • 1/4 bunch fresh thyme
    • 2 bay leaves
    • 1 teaspoon whole black peppercorns

    Preparation:
    • Place the chicken and vegetables in a large stock pot. Cover with enough cold water so that the chicken is just covered, too much and the stock will be weak. Place over medium heat.
    • Add the thyme, bay leaves and peppercorns and allow it to slowly come to a boil.
    • Lower the heat to medium-low and gently simmer for 1 - 1 1/2 hours, or until chicken is done. Add more water during this process if it is needed to keep chicken covered.
    • Carefully remove the chicken to a cutting board. Once cooled, remove skin and bones and shred meat for future use.
    • Strain the stock through a sieve into another pot to remove vegetables and herbs.
    • At this point you can use the stock immediately, or cool and store in the fridge for up to a week or freeze for longer storage.
    Seriously kids, it doesn't get much easier than that. And I promise, it's oh so worth it! Next up, some great soups worthy of this liquid gold!

    Monday, October 17, 2011

    Chocolate Kahlua Cupcake...and a New Crush

    It's official. I'm in love! Blog love that is (Don't worry honey, I still love you too!). Annie's Eats, seriously, how did it take me so long to find you? I even had recommendations from a very reliable source. But don't worry, I've been making up for lost time. I have drooled over mouth watering photos and poured over recipe after recipe after recipe! What really caught my eye while browsing her site were the cupcakes. Each one looked better than the last. I finally decided that I just had to make the Chocolate Kahlua cupcakes. Booze, chocolate, coffee, a winning combination.


    This frosting. I'm not sure how to describe to you how good it is. Amazing. Lip smacking good. Lick every last speck of frosting out of the bowl good. Enjoyed with a cold glass of Kahlua and Cream, this was the perfect way to end an evening.

    Notes from the chef (me): After I started baking, I realized I didn't have enough sugar to complete the recipe as written. I ended up having right under a cup of sugar. I continued through the recipe as written and tasted the batter at the end to see how sweet it tasted. I ended up adding about a tablespoon of honey to the batter. I was very pleased with the results and didn't miss the extra sugar. However, the recipe below is as written from the source.

    Ever decide last minute that you want to bake and don't have time to let your butter come to room temperature? With the butter still in its wrapper, place it in a shallow bowl of warm, not hot, water. Check after about 5 minutes and flip butter so the other side is submerged. In about 10 minutes total you'll have softened butter!

    Original recipe said this would yield 20-24 cupcakes, but I only got 17 from mine.


    Chocolate Kahlua Cupcake

    Ingredients:

    For the cupcakes:
    • ¾ cup unsweetened cocoa powder
    • 1 tbsp. instant espresso powder
    • 1½ cups all-purpose flour
    • 1½ cups sugar
    • 1½ tsp. baking soda
    • ¾ tsp. baking powder
    • ¾ tsp. salt
    • 2 large eggs
    • ¾ cup warm water
    • ¾ cup buttermilk
    • 3 tbsp. vegetable oil
    • 1 tsp. vanilla extract
    • Kahlua liqueur (enough to brush on cupcakes)
    For the frosting:
    • 12 tbsp. unsalted butter, at room temperature
    • 4 cups confectioners’ sugar, sifted
    • 7-8 tbsp. Kahlua liqueur
    • 2 tbsp. heavy cream
    Preparation:
    • Preheat the oven to 350 degrees, and line cupcake pan with liners.
    •  In the bowl of stand mixer, combine the cocoa powder, espresso powder, flour, sugar, baking soda, baking powder and salt; whisk well to blend.
    • Add the eggs, warm water, buttermilk, vegetable oil and vanilla extract to the bowl with the dry ingredients and mix on medium-high speed until smooth, 2-3 minutes, scraping down the sides of the bowl as needed.
    • Divide the batter evenly between the prepared cupcake liners, filling about 2/3 full. Bake until the tops spring back when pressed lightly, about 18-20 minutes, rotating the pans halfway through baking.
    • Let cool in the pan 5-10 minutes, then transfer to a wire rack. Poke a few holes in the top of each cupcake with the tines of a fork and brush with Kahlua while still warm. Allow to cool completely.
    • To make the frosting, beat the butter in the bowl of an electric mixer until smooth and fluffy, about 2 minutes.
    • Mix in the confectioners’ sugar until incorporated.
    • Add in the Kahlua and beat on medium speed until well blended.
    • Add in the heavy cream and beat on medium-high speed for about 4 minutes, until light and fluffy.
    • Frost cooled cupcakes as desired, garnish with shaved chocolate, if you're feeling fancy.

    Wednesday, October 12, 2011

    Ina Garten's Sour Cream Coffee Cake

    Oh my. I should never be allowed to have two big events in back to back weekends again! As I had mentioned last, I was in the process of planning a baby shower for one of my best friends. Well, that was a week ago, and it was a hit! (If I do say so myself). I couldn't have done it without the help of some very special ladies...you know who you are!

    The menu ended up getting tweaked a little. I did serve these biscuits, only I made them a little smaller to yield more from each batch. I also made some blueberry muffins that are a staple at my house. King Arthur Flour recipe, they hardly ever disappoint.

    Since we were doing a brunch, we decided to go with coffee cake to keep with the theme. I love coffee cake. With streussel, without, warm, cold; I'll take it just about any way I can get it. After much searching I found the recipe I wanted to go with. It of course belonged to Ina Garten. I puffy heart love her. If I could be a guest at any Food Network personality's house, it would so be her. I think she'd be a great host and come on, she lives in the Hamptons! The recipe also called for sour cream in the batter. And when it comes to baking, I think sour cream makes almost everything better!


    Notes from the chef (me): The original recipe called for a tube pan, which I didn't have. I chose to break out my bundt pan. I placed the first layer of streusel in the bottom of the pan, followed by a layer of batter, more streusel finished off with the rest of the batter. It took right at 60 minutes to bake completely in the bundt pan. Also, after reading several reviews of the recipe, I noticed many people noted that they needed to double the struessel, so I went ahead and did that as well. The ingredients in the recipe below have been doubled from the original.

    Sour Cream Coffee Cake
    from Ina Garten

    Ingredients:
    • 12 tablespoons (1 1/2 sticks) unsalted butter at room temperature
    • 1 1/2 cups granulated sugar
    • 3 extra-large eggs at room temperature*
    • 1 1/2 teaspoons pure vanilla extract
    • 1 1/4 cups sour cream
    • 2 1/2 cups cake flour (not self-rising)
    • 2 teaspoons baking powder
    • 1/2 teaspoon baking soda
    • 1/2 teaspoon kosher salt

    *I only ever buy large eggs. I decided to take a 4th egg, whisk it just a little, and then added half of that to the batter.

    For the streusel:
    • 1/2 cup light brown sugar, packed
    • 1 cup all purpose flour
    • 3 teaspoons cinnamon
    • 1/4 teaspoon kosher salt (this is the original amount, I felt 1/2 t would be too much)
    • 6 tablespoons cold unsalted butter, cut into pieces
    Preparation
    • Preheat the oven to 350 degrees, grease and flour a bundt pan
    • Cream the butter and sugar in the bowl of an electric mixer fitted with a paddle attachment for 4 to 5 minutes, until light
    • Add the eggs one a time, then add the vanilla and sour cream
    • In a separate bowl, sift together the flour, baking powder, baking soda and salt. With the mixer on low, add the dry ingredients into the batter until just combined. Finish stirring with a spatula to make sure the batter is completely mixed
    • For the streusel, place the brown sugar, flour, cinnamon, salt and butter in a bowl and pinch together with your fingers until it forms a crumble
    • Sprinkle half the streussel topping in the bottom of the bundt pan. Spoon half the batter over the streusel toppings and smooth out with a knife. Sprinkle the rest of the streusel followed by the remainder of the batter.
    • Place the bundt pan on a baking sheet just in case any batter comes over the sides while baking. Bake for 60 minutes, or until a cake tester comes out clean.
    • Let cool for at least 30 minutes before turning out.
    Enjoy! This cake stores well up to 3 days in a covered cake pan. Heated up a little it tastes just as good on day 3 as it did the first day you made it!

    Monday, September 19, 2011

    Oh Baby, Biscuits!

    I have a dear friend who is having her first baby in November. She and I go all the way back to gymnastics classes when we were maybe five years old. My friends and I are currently planning her baby shower and have decided to have a brunch menu. I'm excited about all the items we've chosen for the menu and I am in charge of most them. In the name of friendship, I've started testing different recipes in search of the best ones for the big day. It's all in the name of what's best for the mommy to be.


    That's where these tall and devilishly good biscuits come into play. Biscuits and scones will both be on the shower menu, neither of which I've made before. I looked through all the recipes I've saved and have stashed in my "To Try" email folder and found three different biscuit recipes. I looked over each one and decided to try one from Bobby Flay first, mainly because I had just watched the episode in which he made them. They turned out okay, but they weren't nearly as tall and melt in your mouth as I had envisioned.

    Next I went with the recipe that created the specimen you see above, by none other than Alton Brown. Really, why didn't I just start with his? These were so easy I couldn't believe it. They came together in about 15 minutes, and after another 15 minutes in the oven, they were ready to hit our plates. Just enough time to get the sausage ready, set the table and fill everyone's glasses. Love when things come together like that! The ingredients are very basic and I would venture to guess that most people would have these items on hand.


    Notes from the chef (me): The original recipe said you should get 12 biscuits from this recipe. I only got 6. Maybe that means I didn't press my dough thin enough during the initial press down. But I can tell you this. If biscuits this tall and delicious are wrong...I don't want to be right!

    Southern Biscuits
    from Alton Brown

    Ingredients:
    2 cups flour
    4 teaspoons baking powder
    1/4 teaspoon baking soda
    3/4 teaspoon salt
    2 tablespoons chilled and cubed unsalted butter
    1 tablespoon melted butter
    2 tablespoons shortening
    1 cup buttermilk, chilled*

    *Don't have buttermilk on hand? Place 1 tablespoon white vinegar or lemon juice in a measuring cup and add just enough milk to raise liquid to the 1 cup line. Let stand for 5 minutes.

    Preparation:
    • Preheat the oven to 450 degrees.
    • In a large mixing bowl, combine the flour, baking powder, baking soda and salt. Use a fork to combine the butter and shortening into the dry ingredients until the mixture looks like crumbs. You want to work fast with this step so the butter doesn't start to melt.
    • Make a well in the center and pour in the chilled buttermilk. Stir just until combined, dough will be very sticky.
    • Turn dough onto floured surface. Dust top with flour and fold the dough onto itself 5-6 times.
    • Press into a 1 inch thick round.
    • Cut out biscuits with a 2 inch round cutter. (I used a drink shaker since I don't have a biscuit cutter, and all my drinking classes are square at the opening. This worked perfectly.) Make sure not to twist the cutter as you cut biscuits, or they won't rise as high as they should.
    • Place biscuits on a baking sheet, making sure they are just touching.
    • Reform the scrap dough, working it as little as possible and continue cutting.
    • Bake until the biscuits are tall and light golden brown, 15-20 minutes.
    • And because I couldn't leave well enough alone, I brushed melted butter on the tops of the biscuits as they came out of the oven.
    Linking to: Recipe sharing Monday, Mouth Watering Monday

        Friday, September 16, 2011

        Not Your Normal Chocolate Cake

        Some things were just meant to go together. PB & J, cookies and milk, chocolate and mayo.

        I know what you're thinking. Did she really just write chocolate and mayo? Has she lost her mind? Nick thought the same thing when I mentioned to him that apparently chocolate and mayo had this little fling that I had never heard of. I pride myself on thinking that chocolate and I have a close relationship. We go way back. But yet, I didn't know anything about chocolate hooking up with mayo.


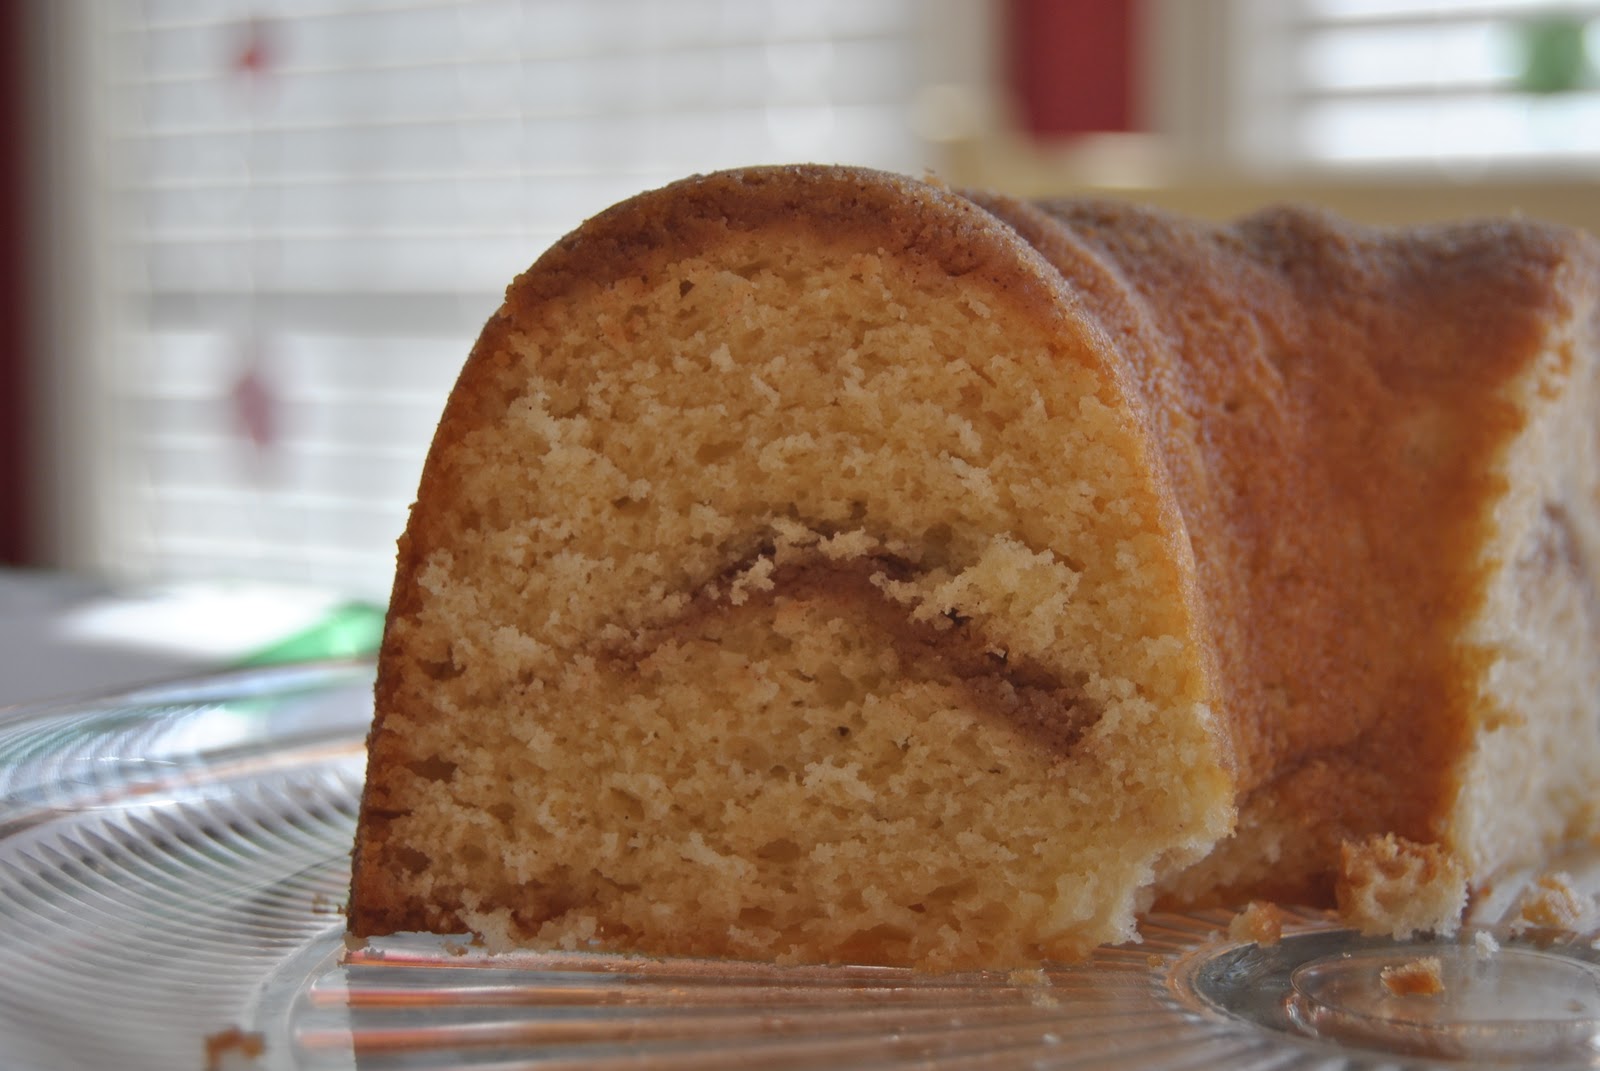
        I stumbled upon this recipe by accident one day. I was browsing Bon Appetit's website looking for inspiration for our weekly menu when I saw the tab for cake recipes. The cakes made me click on the link, it was beyond my control. While perusing the scrumptious looking photos, the title Chocolate Mayonnaise Cake caught my eye. I did a double take. The picture looked so good, how could there be mayo in there? I clicked on the recipe. After reading through the ingredients I went on to read the reviews. Almost every single person was raving about how moist and delicious this odd combination of flavors was. I knew immediately that I would have to try this myself. Not because I wanted to, but for the sake of science. Or humanity. Or something else that was entirely out of my control.

        The plan: Make this chocolate wonder for an upcoming get together we were having at our house.
        The deception: Tell no one what was in it until after they had eaten it.

        I served the plates to my guests and anxiously waited to hear what they would have to say. A few bites in and one of our friends asked what kind of chocolate cake I had made. Do you like it? I asked. His response? Yes, it just has a different flavor.

        At this point I spilled the beans...or more fitting, the mayo. They were definitely surprised, but everyone agreed it was indeed a very moist chocolate cake.

        My overall review: This was a good chocolate cake. Not great, but good. I think more than anything it was the frosting that I wasn't thrilled with. It was almost too rich. While this wasn't my favorite dessert I've ever prepared, I'm glad I tried it. If for no other reason than to say that yes, I have mixed mayo and chocolate...and lived to tell the story.

        Notes from the chef (Me): As you'll see below, the recipe calls for 3, 8" pans. Since I didn't have 3 pans, I used 2, 9" pans instead. My bake time was a little longer because of that, probably closer to 40 minutes. But just be sure to keep a close eye after you hit the 30 minute mark so as not to over bake them.

        Chocolate Mayonnaise Cake
        from Bon Appetit

        Ingredients:


        CAKE

        • 2 ounces bittersweet chocolate (do not exceed 61% cacao), chopped
        • 2/3 cup unsweetened cocoa powder
        • 1 3/4 cups boiling water
        • 2 3/4 cups all purpose flour
        • 1 1/4 teaspoons baking soda
        • 1/4 teaspoon baking powder
        • 1 cup sugar
        • 1 cup (packed) dark brown sugar
        • 1 1/3 cups mayonnaise (do not use reduced-fat or fat-free)
        • 2 large eggs
        • 1 teaspoon vanilla extract


        FROSTING

        • 10 ounces bittersweet chocolate (do not exceed 61% cacao), chopped
        • 1 1/2 cups (3 sticks) unsalted butter, room temperature
        • 3 cups powdered sugar
        • 1 tablespoon vanilla extract

        special equipment

        • Three 8-inch-diameter cake pans with 1 1/2-inch-high sides
        Preparation:

        CAKE

        • Preheat oven to 350°F. Butter and flour three 8-inch-diameter cake pans with 1 1/2-inch-high sides. Combine chopped chocolate and cocoa powder in medium metal bowl. Add 13/4 cups boiling water and whisk until chocolate is melted and mixture is smooth.
        • Sift flour, baking soda, and baking powder into another medium bowl. Using electric mixer, beat both sugars and mayonnaise in large bowl until well blended, 2 to 3 minutes. Add eggs 1 at a time, beating until well blended after each addition. Beat in vanilla. Add flour mixture in 4 additions alternately with chocolate mixture in 3 additions, beating until blended after each addition and occasionally scraping down sides of bowl. Divide batter among prepared cake pans (about 2 1/3 cups for each).
        • Bake cakes until tester inserted into center comes out clean, 30 to 32 minutes. Cool cakes in pans on racks 20 minutes.
        • Run small knife around sides of cakes to loosen. Carefully invert cakes onto racks and let cool completely.

        FROSTING

        • Place chopped chocolate in medium metal bowl; set bowl over saucepan of simmering water and stir until chocolate is melted and smooth. Carefully remove bowl from over water; let melted chocolate cool until lukewarm, stirring occasionally.
        • Using electric mixer, beat butter in large bowl until smooth and creamy. Sift powdered sugar over butter and beat until well blended, about 2 minutes. Beat in vanilla. Add melted chocolate and beat until well blended and smooth, occasionally scraping down sides of bowl.
        • Place 1 cake layer on platter. Spread 3/4 cup frosting over top of cake layer to edges. Top with second cake layer; spread 3/4 cup frosting over. Top with third cake layer. Spread remaining frosting decoratively over top and sides of cake. DO AHEAD Can be made 1 day ahead. Cover with cake dome and let stand at room temperature.
        • Cut cake into wedges and serve.
        I'm linking up with:

        Monday, September 12, 2011

        Caramel Budino with Salted Caramel Sauce

        I consider myself a lucky girl, for several reasons. One of which just happens to be that my husband is a great cook. We both share a passion for all things food related, including having our friends over to share in our culinary adventures. I tend to be a little more conservative with my attempts in the kitchen, while Nick likes to push his limits and try new things. He typically sticks to savory dishes and leaves the baking to me, but this past weekend, while hosting some friends for dinner, he decided to try his hand at a fantastic looking dish he found in the latest publication of Bon Appetit. Caramel Budino with Salted Caramel Sauce. Don't worry, I had no idea what it was supposed to be either. Budino is Italian for pudding. Caramel pudding, with a caramel sauce? Yes, please!

        Yum, right? It was definitely a hit with everyone. Now, this isn't one of those dishes you can decide to make on the spur of the moment. It does take a little planning and preparation in advance since the pudding needs to set. And a little patience while you wait for the pudding to thicken. That being said, it's worth the extra effort for a show stopper dessert for your next dinner party.

        Tips from the chef (Nick): I couldn't find chocolate wafers in our grocery store and opted for Oreos. I just removed the cream filling and used just the chocolate cookies. If you have better options than our small town grocery offers, I think the wafers would be a better choice, but know that Oreos will work in a pinch. Also, next time I would reduce the salt amount called for in the caramel sauce. A little seemed to go a long way and it almost verged on being too salty.

        Caramel Budino with Salted Caramel Sauce
        from Bon Appetit

        Ingredients:

        Cookie Crust

        • 1 cup finely ground chocolate cookie crumbs (about 20 cookies)
        • 2 tablespoons unsalted butter, melted
        • 1/8 teaspoon kosher salt

        Budino

        • 3 cups whole milk, divided
        • 1/4 cup cornstarch
        • 3/4 cup(packed) dark brown sugar
        • 5 large egg yolks
        • 3 tablespoons unsalted butter
        • 2 teaspoons dark rum
        • 1 teaspoon kosher salt

        Salted Caramel Sauce

        • 3/4 cup plus 2 tablespoons heavy cream, divided
        • 1/2 vanilla bean, split lengthwise
        • 1/2 cup sugar
        • 2 tablespoons light corn syrup
        • 4 tablespoons (1/2 stick) chilled unsalted butter, cut into 1/2" cubes
        • 1/4 teaspoon kosher salt
        Preparation:

        Cookie Crust

        • Mix cookie crumbs, butter, and salt in a medium bowl. Place 2 tablespoons in a small bowl; cover and chill for garnish. Press 2 tablespoons cookie mixture onto the bottom of each of eight 8-ounce mason jars or ramekins.

        Budino

        • Whisk 1/2 cup milk and cornstarch in a small bowl; set aside. Heat remaining 2 1/2 cups milk in a small saucepan just to a simmer; set aside. To make caramel, stir sugar and 3/4 cup water in a heavy saucepan over medium heat until sugar dissolves. Increase heat; cook without stirring until an instant-read thermometer registers 210°–220°
        • Line a sieve with a double layer of cheesecloth and set over a large pitcher. Whisk egg yolks in a large bowl. Gradually whisk in hot milk, then cornstarch mixture. Slowly whisk in caramel. Return mixture to saucepan. Whisk constantly over medium heat until mixture thickens and a thermometer registers 175°, about 3 minutes. Remove from heat; whisk in butter, rum, and salt. Pour through prepared sieve.
        • Pour 1/2 cup budino over crust in each jar. Cover; chill until set, 4–5 hours. DO AHEAD Can be made 1 day ahead. Keep chilled.

        Salted Caramel Sauce

        • Place cream in a small pitcher. Scrape in seeds from vanilla bean; add bean. Set aside.
        • Stir sugar, corn syrup, and 2 tablespoons water in a heavy saucepan over medium heat until sugar dissolves. Increase heat to medium-high; boil, occasionally swirling pan and brushing down sides with a wet pastry brush, until deep amber color forms, 5–6 minutes. Remove from heat; gradually add vanilla cream (mixture will bubble vigorously). Whisk over medium heat until smooth and thick, about 2 minutes. Remove from heat; whisk in butter and salt. Strain into a heatproof bowl. Let cool slightly.
        • Spoon 2 tablespoons caramel sauce over each budino. Sprinkle some of reserved cookie crumbs over each.