Thursday, February 25, 2010

Spinach Carbonara


There are several reasons I love living in a small town. The friendly atmosphere, the slower pace, more (but still not nearly enough) greenspace and easy commutes are just a few. Just like everything in life, with the good must come the bad. My biggest personal complaint about small town life is not having access to better ingredients. Sure, we've got a Super Wal-Mart that has aisle after aisle of various grocery products; but go looking for a blood orange and you're going to be out of luck. Plan on having Shitake mushrooms with dinner? Then you better plan a trip to Lexington. Want to try Claire's Spinach Carbonara? Well, of course you can't find fresh spinach fettuccine...or dried spinach fettuccine for that matter!! Not to be deterred by our lack of fine ingredients, I trudged on with *sigh* plain Jane dried fettuccine. I think this has finally convinced us at the Maxwell House that we need to invest in a pasta roller so we can experiment with fresh, homemade pasta. I've already scouted one out that might have to make its way into the budget for next month.

This dish came together almost effortlessly. If you're not familiar with Claire Robinson, she hosts a show on Food Network called 5 Ingredient Fix, where, you guessed it, each dish consists of only 5 ingredients...or less! These are perfect for week night meals and they're usually easy on the clean up.  While we didn't have the spinach fettuccine, this dish also calls for fresh baby spinach leaves. Now, this may be hard for some of you to believe, but until last night, I had never tried spinach!! I know, I know. What can I say? I was never forced to try new things as a child and until Nick and I really started experimenting in the kitchen, I never wanted to try new things as an adult.


While Nick was separating the eggs, he found a double yolk egg. Folklores state this can mean anything from an impending marriage (um...don't think so), you're going to have twins (hmmm...probably not) to a windfall of wealth (yes, please!). Whatever it means, it was pretty cool to see!


Tips for this recipe:

* If you don't have time to bring your eggs to room temperature, simply place them in a glass of warm water for about 5 minutes.

* Make sure to temper your eggs properly before adding your sauce to the hot pan...or you'll end up with a pan full of scrambled eggs!

Enjoy!!

Wednesday, February 17, 2010

Honey Wheat Bread

Bread. It's such a simple, basic staple. Think about it. When the meterologists start forecasting "snowmageddons", the first two items to disappear from the grocery stores are milk and bread. It's on most of our grocery lists week in and week out. We grab our favorite pre-sliced bread, toss it in our cart and don't give it much more thought than that. Bread can be, and is, so much more than what you can grab off the bread aisle at your local grocery store.

I am obsessed with bread. I love to look at it, eat it, read about it, think about it, eat it, wait, did I say that already? Yeah, I really like bread. Until now, it's always been a long distance relationship. I was afraid of it. The whole multiple rising and kneading and water at the perfect temperature, it was too much for me. I finally decided to take the plunge a couple of weeks ago and throw my apron into the ring and take bread baking on once and for all. Round one definitely went to the bread. It was a defeat of epic proportions. I picked myself up from under the table where the bread had managed to toss me, dusted the bread flour off of my apron and stepped back ino the ring. Round two's outcome? I was victorious!

                                   
I scoured the internet looking for just the right recipe for my first attempt. I settled on a highly acclaimed recipe from Allrecipes.com. I'll include the link to the original recipe, but below I'm going to list out my slightly altered directions. They all came from suggestions and comments from reviewers on the site.

Makes 2 9x5 loaves

1 (.25) ounce package *rapid rise yeast
*Apparently my small town doesn't believe in carrying rapid rise yeast. If, like me, all you have is active dry yeast, you will need to increase the amount by 25%, which means you will need .3125 ounces of active dry yeast. A scale comes in very handy here! And wouldn't you know, I just won a scale! More on that to come later.
1 teaspoon white sugar
1/2 cup warm water (100 degrees F)
1 (12 fluid ounce) can of evaporated milk
1/4 cup water
1/4 cup melted shortening
1/2 cup honey
2 teaspoons salt
2 cups (240 grams) whole wheat flour
3 cups (360 grams) white bread flour
2 tablespoons butter

1. Make sure your water is at 100 degrees F, and add the yeast and sugar and lightly stir. Let rest for about 5-10 minutes, until the yeast has started to bubble and foam.

2. Combine evaporated milk, water, shortening, honey, salt and whole wheat flour in a food processor or the bowl of an electric stand mixer fitted with the dough hook. Let rest for 15 minutes.

3. Add the bread flour and process until the dough forms a ball. If using a food processor, process the dough an additional 80 seconds. I used my stand mixer and worked the dough for about 3-5 minutes and then removed it to a well floured counter to knead by hand. If your dough is very tacky (mine was) feel free to liberally flour the counter and the dough itself until it is easier to knead. Knead by hand for 5-8 minutes.

4. Place the dough in a buttered bowl for its first rise. It's best to use a slightly warm bowl. Heat your oven to 170 degrees F (or its lowest setting), turn the oven off and then place an oven proof bowl in for a few minutes, just until warm, then butter and add your dough. Cover with plastic wrap and store in a warm, draft free area. I placed my bowl on my dryer (while running) and closed the laundry room door. Let rise until almost doubled in size, time will vary depending on the temperature of the room. 45 minutes - 2 hours.

5. Once doubled, punch down the dough and divide in half. Roll out each half and pound out the bubbles. Form into loaves, and place in buttered 9x5 bread pans. Cover loosely with plastic wrap and return them to your warm area for their last rise. Again, depending on temperature, it should take 30-60 minutes.


6. Place a small pan of water on the bottom shelf of your oven and preheat to 375 degrees F.

7. Bake for 25-35 minutes, or until tops are golden brown. If the tops begin to brown too fast, simply tent with foil. Butter the tops of the bread while still warm. Slice when cool.


There you have it. Homemade bread! Yes, I know, I need to learn how to slice more consistently sized pieces of bread. I think next time I may even up the wheat flour and cut back on the bread flour to add a little more nutrition into this.


I promise you won't be disappointed with this recipe. Give it a try and let me know what you think.


Wednesday, February 10, 2010

Indoor S'mores!

Wondering what to do with those yummy marshmallows from yesterday? Why not recreate a campfire favorite and make an indoor s'more!


I mean, who doesn't love s'mores? The only complaint I have with them is that my chocolate never melts enough, so you end up biting into an ooey gooey marshmallow and a big hunk of chocolate.

That's something you won't have to worry about with these! I made these for our super bowl party and they were a hit. Let's get started.

What You'll Need:

Homemade marshmallow
1 1/2 pounds Semi-sweet chocolate (or bittersweet, if that's how you roll)
Graham crackers
Confectioners' sugar
Cornstarch

If you've already given your marshmallows time to set up, the first thing you'll need to do is cut the marshmallow to fit your graham crackers. Now, I failed to take Alton Brown's advice about turning the marshmallows out onto a cutting board and instead cut them in the pan. Take his advice, I'm sure it would have much easier if I had! One alteration to his recipe...I did not coat the top of my marshmallows in the sugar/cornstarch mixture because I wanted the tops to be sticky so they would stick to the graham crackers.

To make sure I was cutting my marshmallows down to the right size, I simply laid a graham cracker on top and cut to fit.


Then I would lay another cracker next to that and repeat, until I had an entire row. Make sure to coat your knife or pizza cutter in the confectioners' sugar and cornstarch mixture, it will make the process much easier!


Then simply cut across the marshmallows at the end of the crackers. Again, pull your marshmallows out of the pan first, you'll be thankful that you did.

Once you're finished, pull the crackers and marshmallows out and set them, with the marshmallow on top, on a cooling rack set over a cookie sheet.


Now it's time to break out the chocolate. You need to buy bar chocolate, not chocolate chips. I know, chips are easier, but they contain stabilizers that will mess with the consistency of your chocolate! I went with a semi-sweet, but you could also use a bittersweet if that's what you prefer.

To have a perfectly, shiny chocolate coating that crackles when you bite into it, you need to temper the chocolate. Tempering is all about getting the chocolate to the right temperature. I apparently didn't have the patience that this task requires, so my chocolate wasn't as shiny as it could have been, but it still tasted great and had a nice crackle to it. Follow the link above to learn more about proper tempering.

First thing's first, you need to chop your chocolate very finely. If you have a good serrated knife, that will make the job much easier. Ours is...not so nice, so we used a chef's knife, which also works, it just takes a little more effort. Make this job even easier by batting your eyes at your loving husband and asking him to do it!


Once you have all your chocolate chopped, set 1/3 of it to the side. Bring a pot, filled half way with water, to a simmer. Make sure the water doesn't reach a boil. Place 2/3 of the chocolate in either a glass or metal bowl and place the bowl over the pot. It's important that the bowl is not touching the water below. Stir constantly until the chocolate has melted and has reached 110-115 degrees F. Remove the bowl from the pot and sit on a towel until the chocolate cools to 95-100 degrees F. At this point, add the remaining chocolate and stir until it has all melted. Now it's time to drench our marshmallows in chocolate!

Take a spoonful of the chocolate and pour over one of the marshmallow and graham crackers. Smooth it out and coat to your liking. I chose to make sure all of mine were covered by chocolate, but you could just coat the top if that's what you'd like. But come on, you know it will be better loaded up with chocolate! You'll want to work fairly quickly, since your melted chocolate will start to thicken the longer it sits. Give it a stir every now and then during this process.

It should only take about 8-10 minutes for the chocolate to harden on the marshmallows, at which time you can remove them from the cooling rack and place them on your serving dish. But you need to taste one first!

                                         
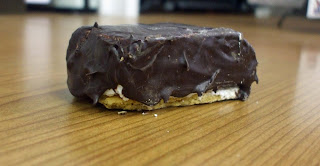
Oh.my.gosh. These are so sinfully good. You can see that the chocolate has a nice bite to it and the fresh marshmallow just melts in your mouth. I could have eaten a whole plate of these! I didn't though, but they did seem to fly off the plate at our Super Bowl party! And remember those mint marshmallows I made also? Mint chocolate lovers will especially appreciate those.

If you really want to recreate that summer, campfire delight, pop one of these babies in the microwave for 5-7 seconds and it will knock your socks off! One bite and the marshmallow will start oozing out the sides...ok, I'm officially wanting another one right now!

These will keep for about 1 day in an air-tight container, after that, the marshmallow starts to make the graham crackers a little soggy. But let's be honest...they won't last that long anyways!

Monday, February 8, 2010

Just Call Me Martha

I have to admit, I felt a little like the home making queen herself after making these delectable goodies over the weekend.


I made homemade marshmallows!!! And they were amazing! I am a self professed marshmallow lover. I can eat them straight out of the bag until my stomach hurts (which I don't know from experience or anything...). However, after tasting homemade marshmallows, I don't think I'll ever be able to look at store bought marshmallows the same. These were just so light and sweet and real tasting. To make it even better, they were very easy to make.

After looking at several different recipes, I decided to go with one from Alton Brown. Mainly because the man is a genuis and I knew he wouldn't steer me wrong. I did try one variation with a small batch of the fluffy goodness, but you'll have to read on to find out what it was!

Homemade Marshmallows courtesy of Alton Brown.

What You'll Need:

* 3 packages unflavored gelatin (found with the jell-o and pudding boxes)
* 1 cup ice cold water, divided
* 12 ounces granulated sugar, approximately 1 1/2 cups
* 1 cup light corn syrup
* 1/4 teaspoon kosher salt
* 1 teaspoon vanilla extract
* 1/4 cup confectioners' sugar
* 1/4 cup cornstarch
* Non-stick cooking spray
* Candy thermometer (I promise it's worth the purchase if you don't already have one!)

What You'll Do:

1. Place the gelatin into the bowl of an electric mixer along with 1/2 cup of the water. Fit your mixer with the whisk attachment.

2. In a small saucepan, combine the remaining half cup of water, sugar, corn syrup and salt. Place over medium high heat, cover and allow to cook for 3-4 minutes. Uncover, clip a candy thermometer onto the side of the pan and continue to cook until the mixture reaches 240 degrees F. This took about 10 minutes for me. Once it has reached this temperature, immediately remove from the heat.

3. Turn the mixer on low speed and, while running, slowly pour the sugar syrup down the side of the bowl into the gelatin mixture. Once you have added all the syrup, increase the speed to high. If you have one of the basic Kitchenaid mixers (ie-not one of the big mega size ones), watch out, because some of the contents might shoot out at you! Continue to whip until the mixture becomes very thick and the outside of the bowl is lukewarm, approximately 12-15 minutes.

During the final minute of whipping, add the vanilla. While the mixture is whipping, prepare the pans.

To prepare the pans:

Combine the confectioners' sugar and cornstarch in a small bowl. Lightly spray a 13 x 9 inch baking pan with the non-stick spray and then coat with the cornstarch and sugar mixture.


~This is the point where Alton would have you pour the whole marshmallow mixture into the prepared pan. Which would be fine and you'd have lovely thick marshmallows to show off. However, there is a slight variation I think you might like.~

4. Fill the pan about 1 inch up the side with the marshmallows, using a lightly oiled spatula for spreading evenly into the pan. Dust the top with enough of the remaining sugar and cornstarch mixture to lightly cover. Fit your bowl back on the mixer and break out some peppermint extract. Start with about 1/4 teaspoon and add while mixing on medium-high speed. Stop and taste and add more if necessary. The amount left in your bowl should easily fill an 8x8 prepared pan. Allow the marshmallows to sit uncovered for at least 4 hours and up to overnight.

5. Once they have set, turn the marshmallows out onto a cutting board and cut into 1-inch squares using a pizza wheel dusted with the confectioners' sugar mixture. Once cut, lightly dust all sides of each marshmallow with the remaining mixture, using additional if necessary. Store in an airtight container for up to 3 weeks.

And voilĂ , you have homemade marshmallows! Now, I didn't simply serve up plain marshmallows to my guests this weekend. Instead, I served a twist on a classic that used these fluffy goodies as the star. You'll have to make sure to check back later to catch that recipe.


Monday, February 1, 2010

Beer Can Chicken

We eat a lot of chicken in the Maxwell house. I mean a lot. There are times that I think if I see one more piece of chicken I'm going to scream! If you're ever been close to a too-much-chicken-meltdown and think you've had it with your feathered friend, I have a great recipe you should try. Pat & Gina Neely's Beer Can Chicken.

Holy goodness this bird is good. Oh so good; and juicy! The meat nearly falls right off the bone.


The chicken with it's spice rub


I failed to get a picture before Nick carved it all up, but here's a shot if it anyway!

My only word of advice for this recipe...place your beer can impaled chicken on a disposable baking dish before placing it on the grill. The first time we attempted this recipe we failed to do this and the fat dripping from the cooking bird sent our grill into flames. Since then, my husband has used this method and there have been no more grill fires, which makes me pretty happy.