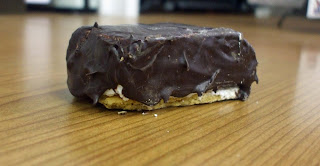
Wondering what to do with those yummy marshmallows from yesterday? Why not recreate a campfire favorite and make an indoor s'more!
I mean, who doesn't love s'mores? The only complaint I have with them is that my chocolate never melts enough, so you end up biting into an ooey gooey marshmallow and a big hunk of chocolate.
That's something you won't have to worry about with these! I made these for our super bowl party and they were a hit. Let's get started.
What You'll Need:
Homemade marshmallow
1 1/2 pounds Semi-sweet chocolate (or bittersweet, if that's how you roll)
Graham crackers
Confectioners' sugar
Cornstarch
If you've already given your marshmallows time to set up, the first thing you'll need to do is cut the marshmallow to fit your graham crackers. Now, I failed to take Alton Brown's advice about turning the marshmallows out onto a cutting board and instead cut them in the pan. Take his advice, I'm sure it would have much easier if I had! One alteration to his recipe...I did not coat the top of my marshmallows in the sugar/cornstarch mixture because I wanted the tops to be sticky so they would stick to the graham crackers.
To make sure I was cutting my marshmallows down to the right size, I simply laid a graham cracker on top and cut to fit.
Then I would lay another cracker next to that and repeat, until I had an entire row. Make sure to coat your knife or pizza cutter in the confectioners' sugar and cornstarch mixture, it will make the process much easier!
Then simply cut across the marshmallows at the end of the crackers. Again, pull your marshmallows out of the pan first, you'll be thankful that you did.
Once you're finished, pull the crackers and marshmallows out and set them, with the marshmallow on top, on a cooling rack set over a cookie sheet.

Now it's time to break out the chocolate. You need to buy bar chocolate, not chocolate chips. I know, chips are easier, but they contain stabilizers that will mess with the consistency of your chocolate! I went with a semi-sweet, but you could also use a bittersweet if that's what you prefer.
To have a perfectly, shiny chocolate coating that crackles when you bite into it, you need to temper the chocolate. Tempering is all about getting the chocolate to the right temperature. I apparently didn't have the patience that this task requires, so my chocolate wasn't as shiny as it could have been, but it still tasted great and had a nice crackle to it. Follow the link above to learn more about proper tempering.
First thing's first, you need to chop your chocolate very finely. If you have a good serrated knife, that will make the job much easier. Ours is...not so nice, so we used a chef's knife, which also works, it just takes a little more effort. Make this job even easier by batting your eyes at your loving husband and asking him to do it!
Once you have all your chocolate chopped, set 1/3 of it to the side. Bring a pot, filled half way with water, to a simmer. Make sure the water doesn't reach a boil. Place 2/3 of the chocolate in either a glass or metal bowl and place the bowl over the pot. It's important that the bowl is not touching the water below. Stir constantly until the chocolate has melted and has reached 110-115 degrees F. Remove the bowl from the pot and sit on a towel until the chocolate cools to 95-100 degrees F. At this point, add the remaining chocolate and stir until it has all melted. Now it's time to drench our marshmallows in chocolate!
Take a spoonful of the chocolate and pour over one of the marshmallow and graham crackers. Smooth it out and coat to your liking. I chose to make sure all of mine were covered by chocolate, but you could just coat the top if that's what you'd like. But come on, you know it will be better loaded up with chocolate! You'll want to work fairly quickly, since your melted chocolate will start to thicken the longer it sits. Give it a stir every now and then during this process.
It should only take about 8-10 minutes for the chocolate to harden on the marshmallows, at which time you can remove them from the cooling rack and place them on your serving dish. But you need to taste one first!
Oh.my.gosh. These are so sinfully good. You can see that the chocolate has a nice bite to it and the fresh marshmallow just melts in your mouth. I could have eaten a whole plate of these! I didn't though, but they did seem to fly off the plate at our Super Bowl party! And remember those mint marshmallows I made also? Mint chocolate lovers will especially appreciate those.
If you really want to recreate that summer, campfire delight, pop one of these babies in the microwave for 5-7 seconds and it will knock your socks off! One bite and the marshmallow will start oozing out the sides...ok, I'm officially wanting another one right now!
These will keep for about 1 day in an air-tight container, after that, the marshmallow starts to make the graham crackers a little soggy. But let's be honest...they won't last that long anyways!


No comments:
Post a Comment
Show some comment love!